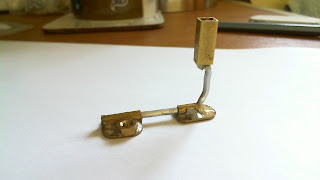
Sooooo what have I been up to recently in terms of getting this puppet finished? Well one of the issues that slowed me down has been a determination to get myself a foot armature design that will be jointed at the toe for the all important flexibility that will make my walks 'oh so' fluid and a design which will also provide the stability necessary to support the rest of the puppet (including a weighty plasticine head). My first attempt was a composite of brass M3 nuts, 1/32" K&S brass strip and 2mm braided aluminium wire all held together with Milliput epoxy putty and soft solder. Needless to say, it didn't really work so well and I 'unfortunately' don't have any pictures of that particular shambolic arrangement to show (saving me some small embarrassment). But for the benefit of anyone who might be interested in knowing how it sort of went together here is a little something I threw together in MS paint :D.
 |
| Foot Armature Design #1 (Note: the nuts are for tie-downs) |
 |
| Foot Armature Desing #2 (Note: Shaw's design actually uses steel plates and tubing due to the use of magnet tie-downs, here I'm using brass and a nut tie-down) |
I have since learnt that with ball and socket armatures, the tension on the joints are strongest at the feet and ankles and lessen with each joint further up the body and I can only assume the same can be applied for the strength of the wire in a wire armature. Retrospectively I should have gone back and tried again but with the 2 lengths of braided wire as in Shaw's images and a larger sleeve of tubing. But instead I felt this idea was a lost cause and went about finding an alternative to a wire foot. I thus entered the complex world of hinge joints. Well only in terms of theorising, I have yet to actually make one and to do so will require a Press Drill for semi-accurate drilling as well as a range of other tools which I can't at this time afford. Massive disappointment! So really that whole issue has really inhibited any further progress. So in the meantime I've decided to bite the bullet and accept that a non-hinged foot design will have to do for now. But what's so great about a plug-in armature is that I can always swap for a hinged foot later, 'tis bloomin' genius! so my current foot design looks like:
 |
| Foot Armature Design #3 Inspiring! (note: the lack of a nut for tie-downs is because I've tapped the brass foot plate) |
But that's not the end of it, oh no! I've also been sculpting my puppet's head... Well I've actually been trialling a dummy head in white Newplast (English plasticine) to feel out the design I'm after and to which I can then sculpt the Milliput hair-do. So no pics here yet I'm afraid, but patience, I should have something to show sooner than later (sound familiar?). And I've also epoxied on some washers to my hand armatures (exciting stuff I know).
So still left on my ever growing 'TO DO' list is the 'small' task of skinning my new foot armatures; my answer here will be to just go with some sculpted Milliput trainers for durability. I also need to sculpt me some plasticine hands which means blending Newplast to make flesh tones... should be interesting. And I'm thinking props here too for all these exercises I'll be doing before long... but lets not get too carried away.
Phew, you stay away for so many months, when you return you realise you've got more to say than you thought. But that pretty much wraps up the latest developments so... 'Til next time (which will be soon I hope).
No comments:
Post a Comment