Sunday 27 March 2011

It's all in the feet.

So this must be the third attempt at diving back into completing this darned puppet... And it's been slow progress, but as the gears are slowly grinding back into action, the pace is gradually picking up. It's been a year or so since I started on my puppet fabrication and only now am I finally moving near completion, and I'm getting excited about this on a whole new, previously unimagined level. The last 12 months have been full of distractions, commitments, procrastination and general laziness. But throughout that time I've really dug deep and researched the whole animation process. The interweb is a brilliant and never-ending goldmine of animation resources through which I've also purchased a few books including Williams' The Animator's Survival Kit and Stanchfield's Drawn to Life which are vital for any aspiring animator; stop mo, traditional or CG. And all this has me oddly confident that as soon as I start pushing this puppet, all that reading, studying, watching and re-watching and re-re-watching will pay off and I'll get some results that won't completely cripple my motivation.

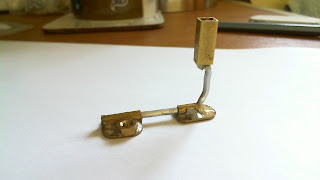
Sooooo what have I been up to recently in terms of getting this puppet finished? Well one of the issues that slowed me down has been a determination to get myself a foot armature design that will be jointed at the toe for the all important flexibility that will make my walks 'oh so' fluid and a design which will also provide the stability necessary to support the rest of the puppet (including a weighty plasticine head). My first attempt was a composite of brass M3 nuts, 1/32" K&S brass strip and 2mm braided aluminium wire all held together with Milliput epoxy putty and soft solder. Needless to say, it didn't really work so well and I 'unfortunately' don't have any pictures of that particular shambolic arrangement to show (saving me some small embarrassment). But for the benefit of anyone who might be interested in knowing how it sort of went together here is a little something I threw together in MS paint :D.

Foot Armature Design #1 (Note: the nuts are for tie-downs)
The key issues with the above design were strength and flexibility... The putty couldn't quite hold it all together and the braided aluminium wire was too inflexible at the toe joint... Which was more or less located in the middle of the foot (anatomically incorrect of course). So I scrapped that design. After much head scratching and a good ol' inspection of the build up puppet in Susannah Shaw's Craft Skills For Model Animation I hit upon my second design. It was until then that i couldn't for the life of me work out a suitable way of joining the aluminium wire to the brass plate of the foot, but Shaw delivered the answer. Her design was similar to mine in terms of two foot plates... one heel and one toe being hinged with armature wire. But this design had the aluminium wire glued into round metal tube sleeves which in turn were brazed onto the foot plate with solder. 'Genius' I thought. So I went about making my own, but rather than use two strands of 2mm wire braided together, I went with only a single strand for greater flexibility. MISTAKE! This compromised the stability of the foot and thus rendered it a waste of effort.

Foot Armature Desing #2 (Note: Shaw's design actually uses steel plates and tubing due to the use of magnet tie-downs, here I'm using brass and a nut tie-down)

I have since learnt that with ball and socket armatures, the tension on the joints are strongest at the feet and ankles and lessen with each joint further up the body and I can only assume the same can be applied for the strength of the wire in a wire armature. Retrospectively I should have gone back and tried again but with the 2 lengths of braided wire as in Shaw's images and a larger sleeve of tubing. But instead I felt this idea was a lost cause and went about finding an alternative to a wire foot. I thus entered the complex world of hinge joints. Well only in terms of theorising, I have yet to actually make one and to do so will require a Press Drill for semi-accurate drilling as well as a range of other tools which I can't at this time afford. Massive disappointment! So really that whole issue has really inhibited any further progress. So in the meantime I've decided to bite the bullet and accept that a non-hinged foot design will have to do for now. But what's so great about a plug-in armature is that I can always swap for a hinged foot later, 'tis bloomin' genius! so my current foot design looks like:

Foot Armature Design #3 Inspiring! (note: the lack of  a nut for tie-downs is because I've tapped the brass foot plate)
Well there we have it. That's my rather fruitless experience with fabricating puppet feet so far. Not mentioned however is the spot of puppet surgery which was a result of a plug-in nut breaking loose on the left calf. This involved slicing off my 'neatly' applied upholstery foam, sanding down the old solder and then brazing on a new brass M3 nut, which also involved briefly setting the puppet on fire :O but with some new foam glued back in place things were as good as new. From this episode I have learnt that a.) I should invest in some hard (silver) solder for stronger joins, b.) to invest in a smaller butane torch and c.) upholstery foam is extremely flammable!

But that's not the end of it, oh no! I've also been sculpting my puppet's head... Well I've actually been trialling a dummy head in white Newplast (English plasticine) to feel out the design I'm after and to which I can then sculpt the Milliput hair-do. So no pics here yet I'm afraid, but patience, I should have something to show sooner than later (sound familiar?). And I've also epoxied on some washers to my hand armatures (exciting stuff I know).

So still left on my ever growing 'TO DO' list is the 'small' task of skinning my new foot armatures; my answer here will be to just go with some sculpted Milliput trainers for durability. I also need to sculpt me some plasticine hands which means blending Newplast to make flesh tones... should be interesting. And I'm thinking props here too for all these exercises I'll be doing before long... but lets not get too carried away.

Phew, you stay away for so many months, when you return you realise you've got more to say than you thought. But that pretty much wraps up the latest developments so... 'Til next time (which will be soon I hope).

Saturday 18 September 2010

Slowly grinding back into action!

So it's been a damned long time since I last posted and I'm ashamed to admit not a lot has progressed in that time. Exams in July and a summer holiday spent mostly chilling out and relaxing has had me put any developments to one side, and hell do I feel guilty. I have however done tonnes and tonnes of research keeping my eyes firmly fixed on the many forums and blogs dedicated to this and many other relevant crafts. Many an hour has been spent trawling the vast ocean of knowledge out there on nearly every aspect of Stop Motion there is. I've learnt much sat in front of my laptop clicking away and now I feel very prepared and eager to jump in and put it all to use.

One avenue I did experiment with was finding a new camera capable of producing those sought after high resolution frames and control that just cant be delivered by many webcams out there. After countless hours of research on the topic, I finally settled on a model I thought would do what I needed. I had read that with DSLRs, which are becoming very popular with Stop motion, there were problems with the Single Lens Reflex mechanisms breaking due to the sheer number of frames that are taken during animation. When you're a student and you're spending nearly £500 on a new camera, you really can't have it breaking on you. So I scoured the likes of Amazon and the photography review sites to find the next best thing, a Compact System Camera. These are also referred to a Bridge cameras and as such, bridge the cap between consumer point-and-shoot models and DSLRs. These cameras provide the control and quality that I was after and so I went hunting for the right model. It needed full manual controls, the option of a AC adapter, and remote capture software. It also had to be compatible with the framegrabber software I intended to buy SMP7. So my many hours research resulted in the purchase of a Canon Powershot S3 IS for the sum of £100 through Amazon. I thought I had struck gold, and was very happy with the product when it came through the post. I played around with it and found it to work perfectly, full manual control over focus, aperture, exposure and the rest. After a lot of faffing getting the camera, my laptop and SMP7 to work in unison everything seemed to be as it should. Then after toying with the camera controls through the computer, via both the canon remotecapture software and SMP7 I realised to my dismay that I couldn't control the focus. After some reading up on the matter it would seem that the Powershot series do not enable full manual focus control through their software. There is only the option to lock and unlock the Auto Focus. So the camera was sold on and I returned to the drawing board. I then stumbled across the Microsoft Lifecam Cinema and after reading positive reviews on stopmotionpro.com I took a gamble and snapped one up for under £40 from Amazon. It provides 720p HD video has a glass lens and full manual control and will be satisfactory until the day comes when I face the inevitable and purchase a DSLR. I have my eyes already on the Nikon D5000 and I am waiting until the day I feel confident to take that step into the world of expensive equipment.

I also spent some time trying to find a better alternative to my homebrew Milliput eyeballs, as previously mentioned I can't find 8mm loose white plastic ball bearings in the UK so I went looking for alternatives. I found an interesting tutorial on making your own puppet eyes which used white plastic pearls available from craft stores so I went online to find something similar. I happened to find some 8mm opaque white glass beads on the-beadshop.co.uk for a considerable price and placed an order for a pack of 10. I had them through the post in no time at all and I'm pleased with them. The individual beads aren't all entirely round but I picked out a few of the best. I then took the advice of the aforementioned tutorial and dipped them in my enamel paint which I first dripped onto piece of scrap card. I had some trouble aligning the eyes on the cocktail sticks I was using to hold them and getting them close enough to identical was a task but after a few tries I ended with a reasonable pair. I shall post photos on my next post once I have them in my puppet's head... oh I can't wait.

Friday 30 April 2010

That damned back burner.

It's been sometime since my last blog and my last tinkering with the old stop motion and that's mainly been due to a return to my studies. The last two weeks have been pretty busy what with exams approaching at the end of May. This has meant I've had to put things on the backburner but I will be doing bits here and there whenand if I get the free time.

So about two weeks ago I dressed my puppet, only now have I got round to a post and photos. The process was laborious to say the least and took me much longer than needed but I'm a stickler for perfection. However, the time it took for me to sew a simple jumper and trousers combo has lead to me feeling that it will sensible to use contact adhesive in place of sewing on future dressed puppets. To be honest I'm not greatly pleased with the outcome... some of the stitching is a bit dodgy here and there and I fear it wont withstand animation. But for now it will do as this is my first puppet and it is solely for practise use.


Above is an image of my dressed puppet with a green jumper, white T-shirt and blue trousers. All materials were recycled from old T-Shirts I no longer wished to keep. I glued the T-shirt detail directly to the puppets chest rather than make it whole to save time.

Next I will be sculpting the hair, face, hands and feet. These will be made with English plasticine (Newplast) except for the hair which I will sculpt in Milliput and then paint. I have considered casting the feet in silicone which would make them more durable and would reduce the need to re-sculpt the foot after handling. Silicone would give the flexibility to animate with but would withstand the constant handling. I've discovered an online site in the UK - Tiranti - which stocks a range of pourable RTV silcones at reasonable prices under £20 and dental plaster for moulds under £5. Its very tempting and I'd love to experience working with this but unfortunately right now I don't have the time nor money. Another experiment I'd love to try is using latex to form durable hands too. It would be a process of dipping and re-dipping the hand in liquid latex to build up a flexible skin over wire fingers and a Milliput palm. But, this is where the ingenuity of plug-in armature parts comes into play, if ever in the future I wish to explore these avenues of puppet fabrication I can do so without having to start from scratch and build a full new armature.

Tuesday 13 April 2010

Armature Has Been Foamed

Well this afternoon I got on with getting my shiny new and improved armature back into the foam body I had been crafting on the previous armature. Thankfully the new armature fits in the foam snug as a bug and only needed a little filling out here and there. So now its all snipped into form and looking pretty good, albeit a little rough, but it'll all be hidden under clothing. Below is an image (just the one this evening) of my puppet slowly coming to shape.

So there you have it one foam covered puppet. The basic shapes are all there to fill out the clothing that will be going on top, I've even included a pert backside. As you may be able to tell this puppet is male.

I've also been making my puppet eyes, they're just balls of Milliput I have carefully rolled into balls and have painted with enamel paints.

Milliput eyes with blue iris

Eyes finished with black pupil

They might need a little touching up and they need to have a coat of gloss varnish but they're the best I can do for the moment. Delrin plastic ball bearings are recommended for using as eyes, they can be drilled and painted and I believe are the type Arrdman uses on W&G. I myself, however, can't seem to find anything online or in shops in the way of 10mm plastic ball bearings. Nor can I find suitable glass beads either, so I'm opting to use these instead, until I can afford to cast my own in polyurethane resin in a RTV silicone mold... All which is a little too adventurous and expensive so early on when what I've got at the moment should do just as fine.

Next I shall be clothing this puppet, I will be recycling a collection of old T-shirts and fine weave garments for the materials, it'll very much be a little bit of making it up as I go along with the materials I have at hand and what will look good, I don't have a particular colour design for the clothing, just a rough plan of the overall outfit. This is where things will get interesting as my sewing technique may be a little rusty.

Puppet Armature Mk II

Today has proven to be a very productive day indeed. As stated in my last post I would get onto building a new armature as soon as I could. Well I didn't waste any time getting down to doing just that. I went back to my plans and altered the designs. Then, with assistance from my very lovely and unbelievably patient girlfriend Charlotte, I managed to crack out a new and improved armature in the past 12 hours. I'm delighted with the result and have some pictures to share.


New Improved chest block

I have significantly improved the chest block with a more suitable shoulder arrangement. This and the hip block are where my wonderful assistant Charlotte proved to be of immense help, I had her hold the whole thing together whilst I brazed the K&S to the plates, She even did a few of the joints on the armature herself... Brazing is really very simple and can be fun. So a big thank you to Charlotte, who is currently asleep behind me whilst I sit up and get this written up as the days events are fresh in my mind.


Grub Screw plug-ins

The above image shows the new M3 brass nuts and steel Grub Screws I recently bought being put to good use and working a treat. As you can see I have salvaged the old armature feet, hands and even the neck to save on time and resources, however I may opt to update the hands with either a washer epoxy glued to the wire or a Milliput core instead for a sturdier palm. Another feature I've not talked about is the Milliput head core.

Textured Milliput head core so the plasticine face will securely key to it.

I made this a while ago, it has a piece of 7/32 square K&S for the 3/16 on the neck and a 3/16 piece to hold a smaller 5/32 piece that will be attached to the hair. This makes both the head and hair fully and easily detachable. I shall be using more Milliput to sculpt the hair making it durable which will ease the animation of the head eliminating the problem with the hair deforming from constant handling. Why make it detachable? Well I was trying to cover the eventuality that I might have to sculpt several different version of the hair style for extreme poses such as fright or surprise or for more realistic portrayal of sudden movement or in case I want to add head wear. Generally just covering for every eventuality, This puppet is going to need to last and be fairly versatile as it will be the workhorse of my animation practise and testing.

Next I shall be sticking this new armature into the foam body I managed to salvage from the other day's incident. Its a shame to see something so beautiful buried away out of site in less than attractive snip foam but I'll take a few more photo's so I can look back and appreciate its beauty. Lets just hope it'll hold up a damn sight better than the last one.

Sunday 11 April 2010

My Foam Build Up And Armature Failure Experience.

So I got to work on affixing the upholstery foam to my armature last night and after a few hours of asphyxiating myself in an enclosed area with the Evo-Stick Impact Contact Adhesive I bought yesterday, I called it a night. A few hours ago I picked up where I left off; which was just a little build up on some details, and as I neared completion, my armature failed. Yup, it broke. The aluminium wire at the join at the left shoulder snapped as I bent the arm to get to the underarm. Sad, I know. So I carefully sliced open my beautiful foam body and found the breakage... I realised there wasn't much I could do as the wire was firmly glued into the shoulder K&S and I wouldn't be able to remove it. So I put on a brave face and carefully sliced the armature out of the foam. I shall try to salvage it once I've made my repair. How am I going to repair it...? Well I'm fairly tempted to throw it in the bin. I should have known that as my first armature it would never hold up. The wire had been under too much stress throughout the construction and was never going to last any rigorous animating. To test this theory I played with the opposite shoulder and before long it snapped clean off like the other. So as soon as I can I shall get to work on making up a new armature body. On the plus; the feet, head and hands can all be salvaged. This time round I will be able to make the necessary adjustments to the design and come out with a stronger result. I have all the materials needed left over from last time and the addition of some new M3 brass nuts and 3mm M3 grub screws. I may have to go out and buy some new solder, the stuff I've been using is old stuff I found in the shed and I'm running low on it, some new fresh unleaded solder with a flux core may be better and healthier. I may even get lucky and find somewhere selling silver solder which would work even better although is more expensive.

Below is an image of the foam build up at about half way with the armature being sandwiched between pieces of foam using that aforementioned potent adhesive. I applied the glue in a thin layer onto both pieces of foam using a lollipop stick, leaving them to become touch dry then firmly sandwiching the foam together over the armature. The bond is instant and I was able to snip it into shape straight away.


I used the craft knife to cut the foam out to the sizes I needed then shaped them using the larger scissors. I used the finer nail scissors for detailing and precise shaping. I do not have an image of the foam cut to shape due to the armature breakage just before I could take a photo. A note that may prove helpful is to use a large plastic bag to collect the foam shavings and chippings whilst you cut it into shape. As I found out, they get everywhere and take ages to pick up off the carpet. Also put down paper because the glue will get everywhere. Oh and one last tip, use gloves, although not hard to wash off, I doubt this stuff is particularly good to the skin.

Saturday 10 April 2010

It's My First Time - Be Gentle

So I'm new to the blogging world and things will probably go quite wrong for me in regards to maintaining this with any sense. But there's a first time for everything and hopefully once i acclimatise, things will go sweetly i'm sure. Well, Stop motion is the basis of this journal and in particular my experiences with it as not just a hobby (and obsession) but hopefully one day a full blown career. Below are images of my first dive into puppet fabrication. I've thrown aside scripting, voice tracks, storyboarding and animatics, and just gone straight in for some hands on puppet making. This is probably one of the areas everyone loves, the puppets, for they are the vessels through which you convey your story. Plus, they're immensely enjoyable to fashion from start to finish. I made up my rough character design (not particularly captivating) and laid out the plan for my armature... all very important stuff. I then collected together the following materials:

- 2mm Aluminum wire
- 7/32", 3/16" and 5/32" square brass K&S tube
- 1/8 round brass K&S tube
- Brass nuts
- Brass bolts (cut to appropriate length)
- Solder
- 5 minute epoxy glue

Once assembled (and after much faffing) those materials became what you can see in the images below.


The first 3 pictures show the K&S plug-ins on the wrists, ankles and the join to the neck. I used some brass nuts and bolts (which I cut down to size) which I fortunately found lying around in my shed... I do like to recycle. However, I do not know what size they are (at a guess M2). Although this isn't a huge problem I went online and purchased some brass M3 nuts so I can use them for the foot tie-downs and on future armatures. I also took the opportunity to buy some grub screws (because these bolts stick out far to much and I predict will become problematic) and some M3 studding and wing nuts to use for the tie downs.


The feet were the hardest part to get right. I first tried holding the foot plates and wire together with epoxy putty... unfortunately I braided the wire and this meant the feet were too stiff. I also found them too big and not particularly attractive so i went back to the drawing board. In my search for a solution, I took a close look at the designs from Susannah Shaw's Craft Skills For Model Animation which I stress is an essential guide for the beginner such as myself. The solution was as follows, in order to attach the aluminium wire to the foot plates I soldered round brass tubing to the heel and toe plates. I then glued the aluminium wire into these creating a flexible join between the two plates. Shaw's puppet design does not have tie down nuts, instead she would, at an educated guess and from what can be seen from the photos, use steel plates for the feet and rare earth magnets as tie downs. I have manipulated the design for my own requirements and added nuts to the toe plates for tie downs.


So there you have it - my first attempt at an armature. There's a lot to be said on the craft of puppet fabrication and the armature is one of those things you need to get right if you want an easily animatable puppet. All said, I'm content with this result and have learnt a lot. Before this I had never brazed, but with blowtorch in hand and some old leaded solder (yeah I may have inhaled more than what's good for you) I got on fine... Well as evident in the above images, I could use some more practise. Puppet Animation is a summation of many crafts and skills and just buckling down and getting your hands dirty is the way to learn them and get good at them. I took a long while researching designs and methods to make my experience easier, and for a while I did get too caught up in the nitty gritty of ball and socket armatures and every other armature machining method under the sun. But I finally gritted my teeth and threw myself on in, I went for the simple, cheap, yet effective route and now I've started there's no stopping me.

Next I shall glue upholstery foam onto the body (yup this is a foam build up puppet). It required a good hunt around town for some suitable contact adhesive but now that I have it I shall get to work. The upholstery foam is some old stuff that has been knocking around the house... more recycling. I will update soon with the results.